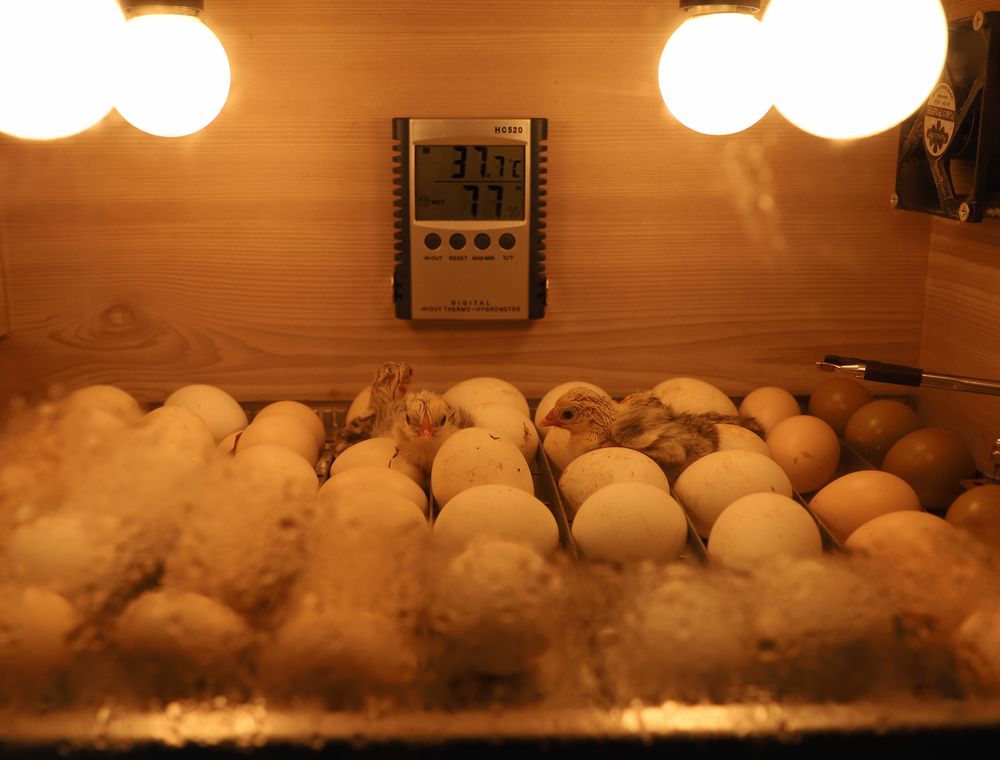
Short answer: For a chicken egg in an incubator, hold the setter at about 37.5 °C (99.5 °F) with roughly 50 to 60 percent relative humidity for days 1 to 18, then move to the hatcher at about 37.0 to 37.2 °C with 65 to 70 percent humidity for days 18 to 21. Candle around day 7 and day 14, stop turning at lockdown on day 18, and aim for an egg to lose about 12 to 14 percent of its starting weight by lockdown. Always confirm settings against your own machine's guidance.
Key takeaways
- Setter: about 37.5 °C and roughly 50 to 60 percent humidity from day 1 to day 18.
- Hatcher: about 37.0 to 37.2 °C and roughly 65 to 70 percent humidity from day 18 to hatch.
- Candle around day 7 and day 14, and remove clear or dead eggs promptly.
- Lockdown on day 18: stop turning, raise humidity and do not open the cabinet more than needed.
- Check the weight loss on your eggs, and use the 12 to 14 percent guide as a target.
Why temperature and humidity work as a pair
Temperature and humidity are often discussed separately, but inside an incubator they work together. Heat sets the pace of development, while humidity controls how fast the egg loses water through its shell. If the temperature is right and the humidity is wrong, the embryo develops at the correct speed but the egg dries out or stays too wet. Both failures reduce the hatch, and they do it in different ways.
The chart in this article gives targets for each stage. If a previous batch disappointed, our article on why eggs don't hatch is a useful companion. Treat the numbers as a starting point. Every incubator has its own sensors, its own airflow and its own weak spots, so the settings you read on the display are the ones that matter, once you have confirmed them against a separate thermometer and hygrometer.
It is also worth remembering that the egg is a living system with its own needs at each stage. Early on, the embryo needs steady warmth and enough moisture to keep the membranes supple. Later, the chick needs less moisture, more room to move and enough air for its last breaths. The chart follows that progression.
Reading the thermometer correctly
Most incubator displays read dry-bulb temperature, which is simply the air temperature at the sensor. A standalone digital thermometer should be placed at egg height, in the middle of the tray, away from the heater and the wall. Readings taken at the top of the cabinet or near the door will not match what the eggs experience.
Humidity is usually measured in one of two ways. A digital hygrometer gives relative humidity directly. A wet-bulb thermometer, a dry-bulb thermometer with a wet wick, gives a reading that can be converted to humidity using a chart. Many growers in Ghana use digital hygrometers because they are simpler, but a wet-bulb setup is also reliable if you know how to convert the readings. For help choosing a machine that displays these readings clearly, see our egg incubator guide for beginners.
- Place the reference thermometer at egg height, in the middle of the tray.
- Read it at the same times each day, and compare it with the machine display.
- If the two differ by more than about half a degree, investigate before you adjust anything.
- Keep the hygrometer clean, and replace the wick on a wet-bulb setup regularly.
The 21-day chart: settings for each day
The table below gives the settings we plan around for a standard chicken egg. Read it as a guide to the stage you are in, not as an instruction to change the machine every day. Most of the time, the setter holds steady and you only make changes at the points marked below.
| Day | Stage | Dry-bulb temperature | Relative humidity | Turning and checks |
|---|---|---|---|---|
| 1 | Setting | 37.5 °C | 50 to 55% | Turn on; confirm temperature stable |
| 2 | Early development | 37.5 °C | 50 to 55% | Turn each cycle; check water tray |
| 3 | Early development | 37.5 °C | 50 to 55% | Turn each cycle |
| 4 | Early development | 37.5 °C | 50 to 55% | Turn each cycle |
| 5 | Early development | 37.5 °C | 50 to 55% | Turn each cycle |
| 6 | Early development | 37.5 °C | 50 to 55% | Turn each cycle |
| 7 | First candling | 37.5 °C | 50 to 55% | Candle; remove clear eggs |
| 8 | Development | 37.5 °C | 50 to 55% | Turn each cycle |
| 9 | Development | 37.5 °C | 50 to 55% | Turn each cycle |
| 10 | Development | 37.5 °C | 50 to 55% | Turn each cycle |
| 11 | Development | 37.5 °C | 50 to 55% | Turn each cycle |
| 12 | Development | 37.5 °C | 50 to 55% | Turn each cycle |
| 13 | Development | 37.5 °C | 50 to 55% | Turn each cycle |
| 14 | Second candling | 37.5 °C | 50 to 55% | Candle; remove dead eggs |
| 15 | Development | 37.5 °C | 55 to 60% | Turn each cycle |
| 16 | Development | 37.5 °C | 55 to 60% | Turn each cycle |
| 17 | Pre-transfer | 37.5 °C | 55 to 60% | Weigh sample eggs; prepare hatcher |
| 18 | Lockdown | 37.0 to 37.2 °C | 65 to 70% | Stop turning; move to hatcher |
| 19 | Hatching | 37.0 to 37.2 °C | 65 to 70% | Keep closed; no turning |
| 20 | Hatching | 37.0 to 37.2 °C | 65 to 70% | Keep closed; prepare brooder |
| 21 | Hatch day | 37.0 to 37.2 °C | 65 to 70% | Wait; remove dry chicks gently |
Two points deserve emphasis. First, the step from 37.5 °C to 37.0 to 37.2 °C at lockdown is intentional, because the developing chick produces its own heat at this stage. Second, the humidity rise from day 15 and again at day 18 supports the membrane and the final weight loss. Make these changes gradually where your machine allows.
Weight loss: the number that tells you the air cell is right
During incubation an egg loses water through its shell, and the air cell at the broad end grows to fill the space. The rate of loss is controlled by humidity and temperature. By the time the chick is ready to pip, a healthy egg should have lost a predictable share of its starting weight. As a general rule, that share is about 12 to 14 percent by lockdown.
Weighing is simple. Choose five or six eggs from the batch at setting, mark them, and weigh them on a kitchen scale. Record each weight. At day 17 or just before lockdown, weigh the same marked eggs again. Compare the figures. The table shows the arithmetic for a 60 g egg.
| Starting weight | Target loss (12%) | Target loss (14%) | Target weight at lockdown |
|---|---|---|---|
| 60 g | 7.2 g | 8.4 g | About 51.6 to 52.8 g |
If the loss is well below the target, the humidity is probably too high or the eggs are retaining too much water. If the loss is well above the target, the air is probably too dry, or the temperature has run high for long periods. Adjust humidity first, because it is the easier change to make, and weigh again before making further changes. The target is a guide, and the chick's health is the final judge.
Candling on days 7 and 14
Candling is the process of shining a bright light through the egg to see what is inside. Done on the right days, it tells you which eggs are developing, which have stopped and which were never fertile. Removing clear and dead eggs early keeps the setter cleaner, reduces the risk of a bad egg breaking and bursting in the tray, and gives you a clearer picture of the batch.
On day 7, a fertile developing egg should show a network of blood vessels spreading from a central dark spot. A clear egg with no visible development should be removed. On day 14, the egg should appear darker, with the embryo filling much of the shell and movement visible in many cases. Eggs that show no movement or have a dark, unclear appearance may have died, and should be removed.
- Darken the room before you start, and use a candler with a strong, focused light.
- Hold each egg up to the light for a few seconds, keeping the candler still.
- Sort into three groups: developing, dead and clear.
- Remove dead and clear eggs quickly, and replace the tray without leaving the cabinet open.
- Record the counts on day 7 and day 14 in your log.
Be gentle. Eggs are warm, and a cold candling room or a long session with the lid open will change the environment. Keep candling short, and plan it for the cooler part of the day where possible. If you have questions about candling or any other step, our frequently asked questions may already have the answer.
Lockdown on day 18, step by step
Lockdown is the moment the eggs stop turning and move into their final environment. It usually takes place on day 18, and it is one of the most important moments in the cycle. The embryo has turned itself into the correct position, with its head toward the air cell, and the chick is ready to start breathing air. Turning now could move the chick out of position and cause problems at hatch.
The lockdown should be planned, not rushed. Prepare the hatcher or change the settings in advance, check that the humidity and temperature are stable, and move the eggs quickly. Use this sequence each time.
- Prepare the hatcher with the target temperature and humidity already running.
- Check the setter is at the expected settings and that the eggs are in their trays.
- Stop turning and lift the trays out in one smooth movement.
- Place the eggs in the hatcher with the trays flat and level, and close the lid.
- Check the readings again after about 30 minutes, and log them.
Once the eggs are locked down, do not open the hatcher more than you must. Each opening drops the humidity and the temperature, and the chick depends on a steady environment in the final hours. Plan your checks for the morning and evening, and keep the lid closed in between. Once the chicks are out, our brooder set-up guide explains how to receive them.
Adjusting for harmattan and the rainy season
The chart assumes a steady room, but in Ghana the room changes with the season. During the harmattan, the air is dry and dusty, and the humidity inside the incubator can fall quickly. Growers in this period often need to add water earlier, use larger water surfaces, or keep the cabinet sealed more carefully. During the rainy season, the air is heavy with moisture, and humidity can run high even with the vents open. In that case, you may need to reduce the water surface or open the vents a little to let moisture out.
Temperature also shifts. A hot afternoon can push the room above the incubator's comfort range, and a cool night can pull the cabinet down. Use the log to see the pattern for your own room, and adjust where needed. A machine placed in a shaded room with good airflow will be far easier to keep on target than one placed in a hot corner. The same discipline applies to the wider farm, as our budget guide for starting a poultry farm explains.
- Harmattan: check humidity twice daily and add water before it falls below target.
- Rainy season: watch for condensation on the glass and reduce water if humidity runs high.
- Hot spells: check the room and cabinet at midday, not only in the morning.
- Cool nights: confirm the heater keeps the cabinet at the target setting.
For more on how these conditions affect the eggs before they go into the setter, see our guide on how to store fertile eggs, which covers the same seasonal pressures during storage.
Need chicks for your next batch?
Send breed, number and town. We reply with price, hatch date and delivery cost in writing.
Keeping a log that shows what happened
A log is the most useful tool in the incubation room. It turns each batch into a record you can learn from. Without one, you are left to remember the readings, and memory is a poor witness when a hatch disappoints. A good log is simple enough to fill in twice a day and detailed enough to explain a problem.
Record the following for every batch, and keep the log beside the machine:
- Date and day number of incubation.
- Machine reading and reference reading for temperature and humidity, morning and evening.
- Turning confirmed, and any manual turns.
- Candling counts on day 7 and day 14.
- Weight loss readings on the marked eggs.
- Any power interruptions, with start time and duration.
- Any action taken, such as adding water or adjusting the setting.
When the batch is finished, read the log from start to end. You will often see the reason for the result in the readings, such as a day when the temperature drifted or a week of high humidity. Use the same format for every batch, and your records will become more valuable with each cycle.
The hatch window and what to leave alone
From lockdown to hatch, the most useful advice is to leave the eggs alone. Chicks hatch over a window of several hours, and in many batches some chicks take longer than others. It is tempting to open the machine, check on each egg and help a struggling chick, but this usually causes more harm than good.
Opening the cabinet changes the humidity and the temperature. Helping a chick out of its shell can tear membranes and cause bleeding, and a chick that is pulled out early is often too weak to survive. Let the chick work its own way out. Most chicks that are going to hatch will do so within the window, and chicks that are still in the shell after a long wait are often not viable.
When the chicks are dry and fluffy, move them to the brooder. Remove them gently, leave the shells in the hatcher, and do not put wet chicks into a warm dry brooder. The move should be quick and calm. If you plan to raise these chicks on your own farm, our hatchery page explains how we handle chicks before dispatch, and if you would rather not run a machine yourself, the egg hatching service may suit you better.
A worked example from start to hatch
To see how the chart works in practice, consider a batch of 240 eggs set on day 1 in a forced-air setter. The average starting weight is 60 g, and five marked eggs weigh between 59 and 61 g. The setter runs at 37.5 °C and 50 to 55 percent humidity. On day 7, the candling shows 200 developing eggs and 40 clear ones, which are removed. On day 14, eight dead eggs are removed, leaving 192 in the setter.
On day 17, the marked eggs weigh about 52 g on average, which is a loss of roughly 13 percent. That is within the target, and the humidity is adjusted by a few points for lockdown. On day 18, the eggs are moved to the hatcher, which is already running at 37.1 °C and 67 percent humidity. The chicks begin to pip on day 20 and most are out by the end of day 21, with the final few emerging later that day.
The batch result is 170 chicks. The loss is spread across candling, mid-cycle deaths and a small number of late or weak hatches. The log shows a short power cut on day 11, which lasted about 40 minutes and was covered by the backup supply. The numbers do not guarantee the same result for another batch, but they show how the chart and the log work together to explain what happened. If you are still deciding how many chicks to start with, the planning guide on starting numbers works through that decision.
Questions farmers ask
What temperature should I set for chicken eggs in an incubator?
For the first 18 days, hold the setter at about 37.5 °C on the dry-bulb reading. At lockdown, move to the hatcher at about 37.0 to 37.2 °C. Always check the setting against a separate reference thermometer placed at egg height, because the display can read differently from the eggs.
What humidity should I use during incubation?
Use about 50 to 55 percent relative humidity for the first two weeks, rising to about 55 to 60 percent in the final days of the setter stage, and about 65 to 70 percent in the hatcher from day 18. Adjust for the season, and check with a hygrometer rather than relying on the machine alone.
When should I candle my eggs?
Candle around day 7 to see which eggs are developing, and again around day 14 to remove dead eggs. Use a darkened room and a strong, focused light, keep the sessions short, and record the counts in your log so you can see how the batch is progressing.
What does lockdown mean and when does it happen?
Lockdown is the point where the eggs stop turning and move into their final environment, usually on day 18. The chick settles into its final position. Turning after this point can move the chick out of place, so stop turning and keep the cabinet closed while the hatch takes place.
How much weight should an egg lose by lockdown?
As a general guide, an egg should lose about 12 to 14 percent of its starting weight by lockdown. For a 60 g egg that is roughly 7 to 8 g. If the loss is much lower, the humidity may be too high. If it is much higher, the air may be too dry or the temperature may have run high.
Should I help chicks hatch that seem stuck?
In most cases, no. Opening the cabinet changes the humidity, and pulling a chick out of its shell can tear membranes and cause bleeding. Let the chick work its own way out, and plan to remove dry chicks gently once they have finished hatching. Chicks that are still in the shell after the normal window are often not viable.
How does Ghana's climate affect incubation settings?
The harmattan brings dry, dusty air that can lower humidity quickly, so you may need more water. The rainy season can push humidity too high, so you may need less water or more ventilation. Hot spells can push the room above the machine's comfort range, so check the readings at midday as well as morning and evening.


