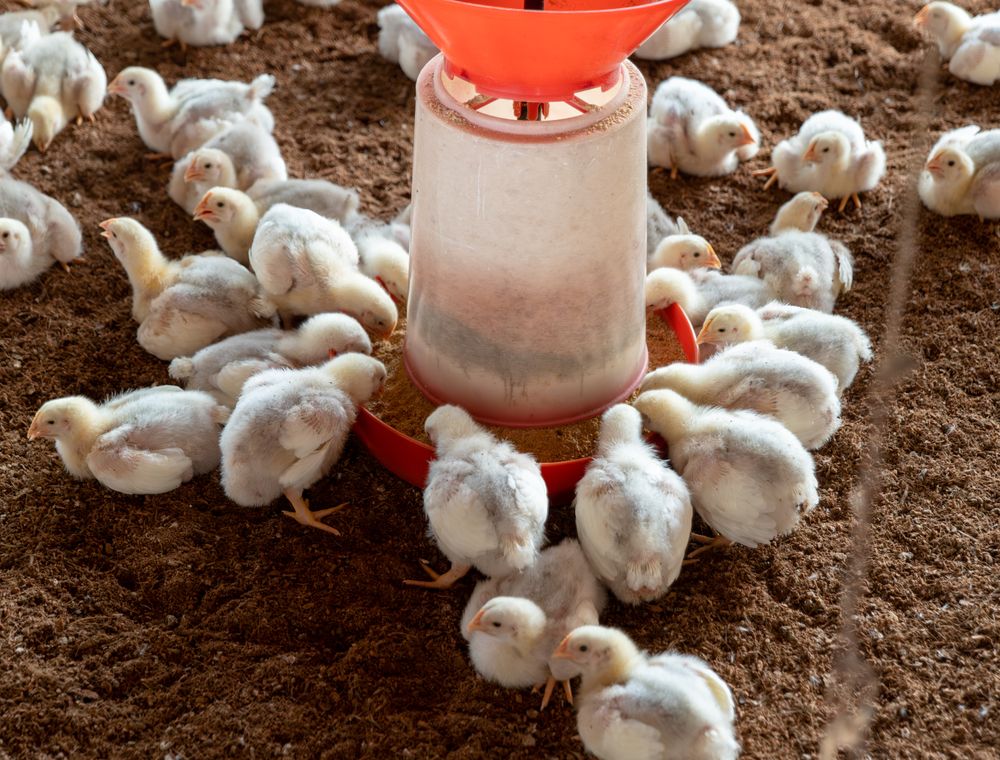
Short answer: A broiler house in Ghana is set up in three parts: a site with reliable power, water and road access; a brooding area that keeps chicks warm and close to food and water in the first week; and enough feeders and drinkers for the birds you will have at market weight. Set the lighting to a simple programme, test everything three days before the chicks arrive, and have a count and photo routine ready for delivery day.
Key takeaways
- Choose a site with reliable water, power or a generator, and a road that feed trucks can use in the rainy season.
- Fence the brooding area with a guard ring or partition so chicks stay warm, close to feed and water, and off cold or damp litter.
- Plan feeders and drinkers per bird for the final weight, and change the equipment as the birds grow.
- Use a simple lighting programme with long light periods early and a lower total light later, and test the lamps and timer before the chicks arrive.
- Count the chicks on arrival and send a photo on WhatsApp the same day, so that any dead on arrival can be replaced in the next hatch.
What the house has to do in about seven weeks
A broiler cycle is short, and the house must change its role several times in that period. In the first week the chicks need heat, light, close access to feed and water, and protection from draughts and predators. From week two the birds grow fast and need more space, more feeder and drinker capacity and a steady supply of fresh litter. In the final weeks the birds are large and the house must carry a lot of weight, a lot of water and a lot of heat from their bodies. A setup that works on day one can fail badly by week six if it was planned only for the first few days.
Plan the set-up around the final weight and the market date, then work backwards. Ask which week you plan to sell, what weight you expect at that week, and how many birds will be in the house at that weight. Those three figures decide the equipment you need, the space you have to keep and the water you must supply. Our broiler day-old chicks page lists the breeds we supply, and the breed guide you choose will give the expected weight at each week.
Broilers are heavy eaters and heavy drinkers. Water intake is often around twice the weight of feed intake, so a house that is short of water will slow growth quickly, even when feed is plentiful. Build the water system for the peak of the cycle, not for the chick stage.
Site essentials: power, water and access
The site decides how smoothly the house will run. Start with the three things a broiler house cannot do without: water, power and access. Water must be available in quantity on the hottest day of the cycle, and the supply must not fail in the dry season. A borehole, a well or a storage tank filled by a reliable source all work, provided that you test the water and keep the tank covered. Power is needed for lights, fans and water pumps, so check the supply and plan a generator or a second light source for outages. A dead pump in the middle of the heat can cost birds within hours.
Access matters more than farmers expect. Feed trucks, chick vehicles and the vehicle that collects the birds at sale must reach the house in the rainy season. A road that floods for a week is a real cost, because feed runs out, and sale is delayed while the birds grow past the market weight. Check the road at its worst, not on a dry morning.
Keep the site away from other poultry, particularly layer houses and dumps, and leave room for a proper buffer zone. Our note on biosecurity on a poultry farm explains how to lay out the entrance and the working area so that vehicles and people do not carry disease into the houses.
The brooding area: keep the chicks warm and close
The brooding area is the small part of the house where the chicks live for their first week or two. It should be a defined space, usually enclosed by a guard ring of cardboard, board or plastic sheeting, with a brooder or heat source at one end. The chicks must be able to reach feed and water within a few steps, and they must not be able to crowd into a corner where they pile up and suffocate.
Size the brooding area for the number of chicks you are placing, not the whole house. A typical guideline is around 25 to 30 chicks per square metre in the brooding area, with fewer chicks in very hot weather. Expand the guard ring as the chicks grow, and remove it completely by about the end of week two, once the birds can use the whole house without chilling.
Temperature is the most important part of brooding. Place a thermometer at chick height, not at the roof, and aim for the temperature the supplier or your vet recommends for the first days. In the first days chicks need a warm area near the heat source and cooler space further away, so they can move to the temperature they prefer. Reduce the heat gradually as the birds grow. Watch the birds rather than the thermometer alone. Chicks huddled tightly under the heat are cold. Chicks spread out, panting and drinking heavily are too hot. Chicks spread evenly around the brooding area and feeding normally are comfortable.

In Ghana's warmer months the house often needs less artificial heat than the textbook suggests, and in harmattan nights it may need more. Keep the brooder flexible, and check it at night as well as in the morning. Our guide to the brooder setup before day-old chicks arrive covers the heat source and the first-week routine in more detail.
Feeders and drinkers per bird
Equipment is where many new farms are short. Too few feeders and drinkers means that the strongest birds feed and drink while the weaker ones are left behind, and the flock grows unevenly. Too much equipment wastes money and leaves spilled feed to rot. The numbers below are typical ranges used on tropical broiler farms. Check them against your equipment supplier's guide, because the design of the feeder or drinker changes the number of birds it serves.
| Equipment | Use | Typical number of birds per unit | Notes |
|---|---|---|---|
| Chick feed tray | First week | about 50 to 100 chicks per tray | Keep trays filled, and spread them through the brooding area |
| Chick drinker | First week | about 50 to 100 chicks per drinker | Place on a drip tray and keep the water at a shallow depth |
| Tube or pan feeder | From about week two | about 70 to 80 birds per feeder | Adjust the height so the rim sits level with the birds' backs |
| Bell drinker | From about week two | about 60 to 80 birds per drinker | Keep the water level set so birds can reach without wading in |
| Nipple drinker | From the start, if used | about 8 to 12 birds per nipple | Check the flow rate and the pressure at the end of each line |
Two principles make the table work. First, count the equipment for the final weight of the flock, and add some extra for the weakest birds. Second, spread the equipment evenly across the whole house. Feeders and drinkers clustered at one end leave the rest of the house unused, and birds crowd where the equipment is.
Adjust the height as the birds grow. Tube and pan feeders should sit at about the level of the birds' backs, so that the birds can reach without climbing or stretching, and the feed does not spill out. Drinkers should be at the height where the birds can drink without standing in the water. Raise them every few days during the growing period, and check them each morning.
Placing equipment and avoiding the common traps
Where you place the equipment matters as much as how much you have. The aim is an even spread, so that birds at every point in the house can reach feed and water without a long walk. Place feeders along the length of the house in lines, leaving a clear walkway for you. Put drinkers between the feeders, so that a bird that has just fed can drink without moving far.
Watch for the traps. A drinker set under a leak in the roof will be wet all the time and foul the litter around it. A feeder placed near a door will get the draught, and the birds around it will be cold. A tube feeder hung too low will spill feed onto the litter, and feed on wet litter soon spoils. Walk the house each morning and watch where the birds gather. The crowd tells you where the equipment or the climate is wrong.
- Feeders in lines with a walkway, and drinkers between them.
- Drip trays under every drinker that could leak.
- Feeders and drinkers away from doors and open vents, where draughts are strongest.
- Equipment height raised as the birds grow, and checked every few days.
- Spare feeder and drinker parts kept in the store for quick repairs.
A simple lighting programme
Lighting shapes how birds feed, drink and rest. A broiler house is normally lit for long periods early in the cycle, so that chicks eat and drink often in the first days, and then lit for slightly shorter periods later to help the birds settle and reduce stress and leg problems. The exact programme depends on the breed and the supplier's guide, so treat the example below as a typical starting point rather than a rule.
| Age | Light period (typical) | Purpose |
|---|---|---|
| Days 1 to 3 | about 23 hours light, 1 hour dark | Chicks find feed and water quickly |
| Day 4 to end of week 1 | about 20 hours light, 4 hours dark | Settle the birds into a rest pattern |
| Week 2 to market | about 18 to 20 hours light | Reduce stress and support steady growth |
Light intensity matters too. The light should be bright enough to see the feeders and drinkers clearly, and dim enough that the birds can rest. A dimmable LED bulb on a timer is a practical choice on most farms. Use a bulb at each end of the house and a few in the middle, and check that the light is even. Dark corners encourage crowding, and bright glare can keep the birds awake and restless.
Power cuts are common enough to plan for. Keep a battery lamp or a second light source in the store, and make sure your timer is set to restart the lights correctly after an outage. Note any power cut in the daily record, because it can explain a sudden change in feeding or behaviour later in the day.
Litter and bedding for the first weeks
Litter in the brooding area should be dry, clean and deep enough to protect the chicks' feet from the cold floor, usually a few centimetres at the start. Spread it evenly, and remove any damp or caked material before the chicks arrive. Good litter absorbs droppings and water quickly, and it keeps the house from smelling of ammonia in the first week, when the birds are small and sensitive to it.
Add fresh litter as the birds grow, and keep it dry around drinkers and at the house doors. The detailed rules for litter depth and choice are covered in our article on poultry housing designs, so here it is enough to say that litter is part of the setup, not an afterthought. Put the litter in place before the chicks arrive, and check it on the day you bring them in.
Need chicks for your next batch?
Send breed, number and town. We reply with price, hatch date and delivery cost in writing.
A setup timeline from the week before
Setting up a broiler house in a hurry leads to missed jobs. Work through the timeline below, so that each task is done in a sensible order and the house is ready before the chicks are on their way.
| When | Task | Check |
|---|---|---|
| Seven days before | Clean and disinfect the house, and fix any leaks or gaps | House is dry, sealed and free of old litter |
| Five days before | Spread fresh litter and set up the brooding area | Guard ring is in place and litter is even |
| Three days before | Switch on the heat source, lights, fans and water | Temperatures and water flow tested at chick height |
| Two days before | Place feeders and drinkers, fill trays and check spacing | Equipment matches the number of chicks |
| One day before | Test the generator, timer, lamps and battery backup | Power cut plan works end to end |
| Delivery day | Receive chicks in the buffer zone, count and send the photo | Count recorded and dead on arrival noted |
The timeline assumes you order the chicks in advance and agree the delivery day in writing. Our delivery page explains how chicks are dispatched across Ghana, and the order form lets you confirm the quantity and the breed before payment.
The day the chicks arrive
The arrival routine is short but important. The chicks come in ventilated boxes of 50, and they must be unloaded quickly and calmly. Carry the boxes into the buffer zone, not straight into the house, and place them in the brooding area without dragging them over the litter. Let the chicks walk out of the box onto the feed and water, and watch them for the first hour.
Count every box on arrival, and record the count in the daily record. Any chick found dead on arrival is recorded and photographed, and we replace dead on arrival free in the next hatch when the count and the photo are sent on the same day. Send the count and photo to us on WhatsApp at +233 24 915 1503, so that the replacement can be arranged while the details are fresh.
- Unload in the buffer zone, and keep visitors away from the brooding area.
- Count each box and record the total.
- Photograph any dead on arrival, and send the photo the same day.
- Place the chicks on the feed and water, and watch them move.
- Check the temperature at chick height an hour after they settle.
Common setup mistakes
Most of the problems we hear about in broiler houses come from a short list of setup mistakes. Each one is easy to avoid if you know it is coming.
- Too few drinkers in the first week. Chicks that cannot find water in the first hours lose weight early, and that weight rarely comes back in full.
- A guard ring that is too large. Chicks spread out in a cold house and cannot keep warm. Keep the ring tight at the start.
- Heat source placed at the wrong height. A brooder hung too high leaves the chick level cold, and one hung too low can scorch the litter and the chicks.
- Feeders filled but not spread. Birds crowd at the nearest feeder while the rest of the house goes unused.
- No power backup. A single outage in the first night can cost birds that need heat and water quickly.
- Setting up on the day of arrival. A rushed set-up misses the leaks, the cold spots and the missing parts that only appear under real conditions.
Read our guide to getting heavy broilers for the management that follows a sound setup, and the broiler feeding schedule for the feed changes over the cycle.
Broiler house setup checklist
Use this checklist in the three days before the chicks arrive. Tick each item on paper, and keep the list with your records so that you can see at the end of the batch how the setup performed.
- Site has reliable water, a working power supply and a backup light source.
- Feed trucks and chick vehicles can reach the house in the wet season.
- House is cleaned, disinfected, dry and sealed against rats and wild birds.
- Brooding area is marked with a guard ring sized for the number of chicks.
- Litter is fresh, even and dry, with no damp patches.
- Heat source and thermometer are at chick height, and the temperature has been tested.
- Feeders and drinkers are counted for the final weight and spread evenly.
- Drinkers are on drip trays, and nipple lines have been checked for flow.
- Lighting programme is set on the timer, and the bulbs are dimmable and even.
- Generator, timer and battery lamps have been tested.
- Entrance has a footbath, a boot station and a visitor log.
- Daily record sheet and mortality log are ready at the house door.
When the list is complete, the house is ready for the birds. If you want help planning the timing of your chick order, or a second opinion on your layout, call or message us on WhatsApp at +233 24 915 1503. You can also read our frequently asked questions or learn more about who we are and how we work.
Questions farmers ask
How many feeders and drinkers does a broiler house need?
Typical guidelines are about 70 to 80 birds per tube or pan feeder and about 60 to 80 birds per bell drinker from the second week, with nipple drinkers at about 8 to 12 birds each. Chick trays and drinkers in the first week are closer together, around 50 to 100 chicks each. Count for the final weight of the flock, and check the figures with your equipment supplier.
How big should the brooding area be?
A typical guideline is about 25 to 30 chicks per square metre in the brooding area, with fewer in very hot weather. Use a guard ring to keep the chicks close to feed, water and heat. Expand the ring as the birds grow and remove it by about the end of the second week.
What temperature should I keep for day-old chicks?
Follow the temperature your supplier or vet recommends for the first days, and measure it at chick height rather than at the roof. Watch the birds as well as the thermometer. Huddled chicks are cold, and chicks spread out and panting are too hot. Reduce the heat gradually as the birds grow.
How much light does a broiler need?
A common programme gives about 23 hours of light and 1 hour of dark for the first three days, then about 20 hours of light for the first week, and about 18 to 20 hours of light from week two. The exact programme depends on the breed and the supplier's guide. Use dimmable lights on a timer, and keep a backup light for power cuts.
Can I use a closed house for broilers in Ghana?
Most farms use open or semi-open houses with curtains, because they breathe well in the tropical climate. A closed house needs fans and reliable power, and fans can fail. If you use a closed house, plan a fallback for outages and check the house temperature more often than you would in an open design.
What should I do if chicks are dead on arrival?
Count the dead birds, photograph them, and send the photo and the count to us on WhatsApp at +233 24 915 1503 on the same day. Dead on arrival birds are replaced free in the next hatch once the count and photo are received. Record the numbers in your daily record as well.
How far in advance should I set up the house?
Plan the set-up about a week ahead, and finish the critical checks three days before the chicks arrive. That gives time to find and fix leaks, cold spots and faulty equipment, and leaves the heat and the water running long enough to test them properly under real conditions.
Do I need a generator for a broiler house?
A generator is not always essential, but a backup for power is strongly recommended. Chicks need heat and water in the first days, and a power cut at night can cost birds quickly. At minimum keep battery lamps and check that the timer and water pump restart correctly after an outage.

